Best Airstream Fold-Down Replacement Steps: OEM vs Aftermarket Options
Fold-down steps are RV entry stairs that pivot or slide from a fixed bracket under the doorway or inside the entry, designed to deploy quickly and stow for travel. Typically aluminum or steel, they can be upgraded for higher stability and capacity. If you’re asking where to find fold-down steps made for Airstream campers, start with the purpose-built lines from MORryde and Torklift that publish Airstream fit charts and accessories, plus a tool‑free brace for stock steps. Check the MORryde StepAbove catalog for models and capacities, Torklift’s Airstream GlowStep pages for sizes, and the Air Step Brace for non-permanent stabilization. OEM-style replacements and hardware are also available through Airstream dealers and RV parts retailers. This RV Critic guide helps you measure, compare, and install with fewer surprises.
Quick links:
- Measure your entry: Step 1
- Compare OEM vs aftermarket trade-offs
- Fitment and purchasing guide
- Step-by-step installation: Step 5
What to know before you replace Airstream steps
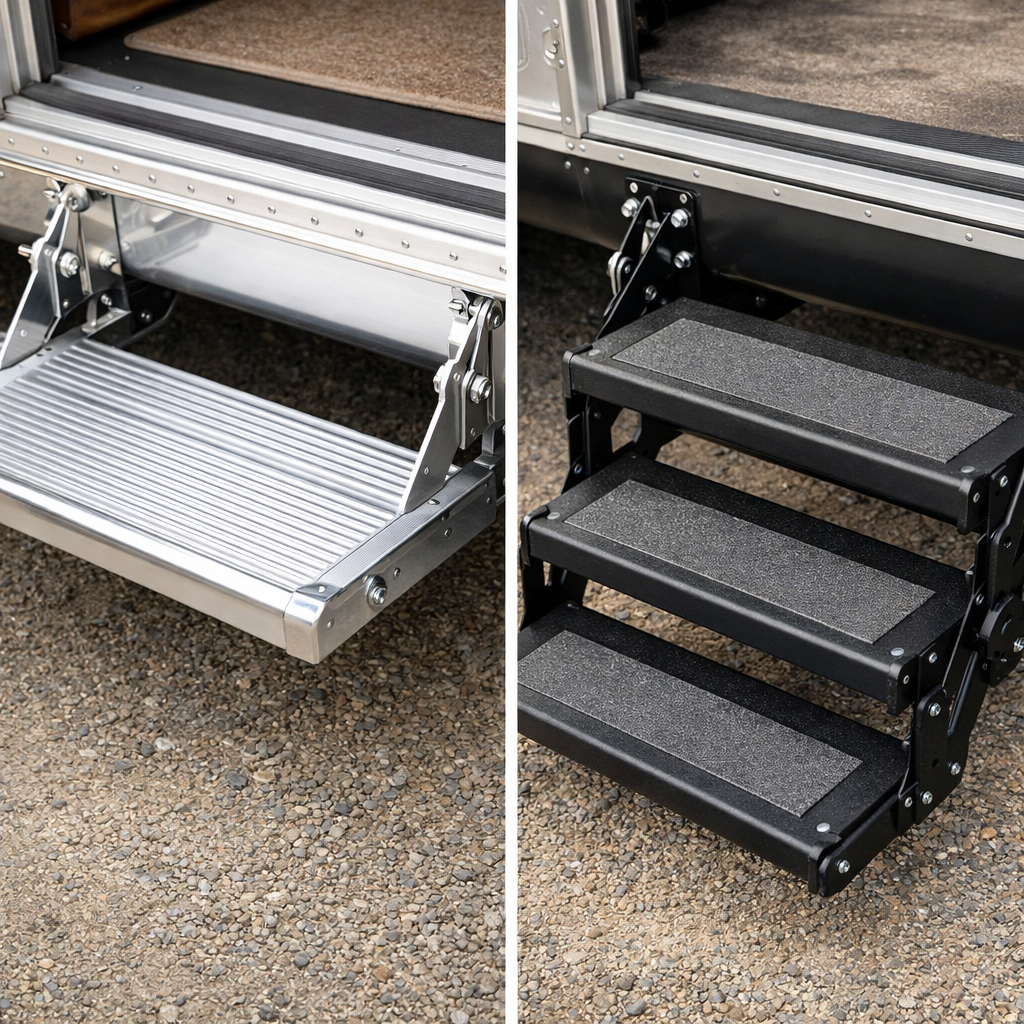
Factory Airstream replacement steps often get the job done, but owners commonly report wear, flex, and rust in slide tracks over time; sticky mechanisms and bent hinges are frequent triggers for a swap, refresh, or upgrade, as documented in an independent teardown and fitment guide (HorsepowerHub). Community threads also catalog real-world replacement paths and retrofits across model years (AirForums).
OEM vs aftermarket in brief: OEM steps are the factory-installed units designed to original specifications and mounting points. Aftermarket steps are third-party replacements or upgrades that may offer higher stability, capacity, or adjustability, often requiring measurement checks and, in some cases, minor mounting adaptations.
Preview your top options (RV Critic’s shortlist):
- MORryde StepAbove: Pull-down steps that stow inside the doorway, with adjustable feet and bounce- and wobble-free stability; some models list up to 500 lb capacity (MORryde catalog).
- Torklift GlowStep Revolution: Emphasizes an “earth-to-RV” connection with infinite leg adjustability, aircraft‑grade construction, glow treads, and a lifetime warranty (Torklift Airstream guide).
- Air Step Brace: A no-drill stabilizer for two-step aluminum Airstream stairs; slides in at camp and removes for travel (Air Step Brace overview).
Tools you’ll likely need: tape measure, camera, sockets/wrenches, torque wrench, rust-inhibiting paint, and safety supports (jack stand or helper).
Step 1: Measure your entry and mounting points
Accurate measurements prevent misorders and rework. Capture numbers on level ground, then keep a worksheet for quick comparisons.
- Measure threshold-to-ground height (“A” dimension) on level pavement. Note how much it varies at your typical campsites.
- Measure the inside width of the mounting bracket and record bolt hole center‑to‑center distances. For example, one documented unit showed a 25‑1/4 in. bracket width and 4.5 in. bolt spacing (HorsepowerHub).
- Photograph the current step (single vs double, slide-track vs hinge) for apples‑to‑apples comparisons.
Threshold height defined: It’s the vertical distance from the bottom of the door opening (entry sill) to the ground. This dimension dictates whether you need a 2‑ or 3‑step assembly and how much leg adjustability is required. Measure on level pavement and note slope variations to avoid ordering steps that are too short or too tall.
RV Critic suggested measurement worksheet:
| Dimension | Your measurement | Target product spec | Notes |
|---|---|---|---|
| Threshold-to-ground “A” height | Level ground vs campsite slope | ||
| Bracket inside width | Interference with belly pan/skirts | ||
| Bolt spacing (center-to-center) | Horizontal and vertical patterns | ||
| Doorway width clearance | For indoor-stow systems | ||
| Existing step type | Single/double; slide-track or hinge |
Step 2: Choose OEM-style or aftermarket upgrade
Use this quick selector based on stability needs, mobility requirements, and budget:
- Choose OEM-style replacements for the lowest cost and original fit if you’re satisfied with the current design and only need a refresh.
- Choose MORryde StepAbove for maximum indoor‑stow stability, adjustable feet, and high capacity (some models rated 500 lb; see MORryde catalog).
- Choose Torklift GlowStep Revolution for “earth-to-RV” stability, infinite leg adjustability, aircraft‑grade build, glow treads, and a lifetime warranty (Torklift Airstream guide).
- Choose Air Step Brace to reduce bounce on two‑step Airstream stairs without drilling or permanent changes (Air Step Brace overview).
Configuration cues: GlowStep Revolution is available in 2‑ and 3‑step options that commonly map to “A” heights around 21.5 in. and 24.5 in. ranges on Airstreams (Torklift GlowStep fit page). RV Critic prioritizes stability and a clean bolt‑on fit over minimal cost when selecting upgrades.
Step 3: Remove the factory steps safely
- Expect roughly two bolts per side (four total) on many fold‑down units (HorsepowerHub).
- Support the step assembly with a jack stand or helper before loosening hardware so it doesn’t drop unexpectedly.
- Label shims/spacers as you remove them to maintain alignment during reinstallation.
- After removal, inspect for corrosion, elongated holes, bent brackets, or wall damage; rust and binding in metal tracks are common issues on older steps (HorsepowerHub).
Step 4: Prep the mounting bracket and hardware
- Clean the bracket, remove scale, and repaint with a rust‑inhibiting coating; a fresh hardware set and a quality paint like Rust‑Oleum can extend service life (HorsepowerHub).
- If mounting holes are elongated or cracked, plan on reinforcement or professional help—this may exceed a simple bolt‑on swap.
- If your installation involves rivets on Airstream skins or sub‑brackets, know the basics:
- Buck riveting: a two‑person method using a rivet gun and bucking iron to achieve strong, factory‑grade results (Innovations in Stainless DIY tools).
- Olympic rivets: used when backside access is blocked; faster but not as strong as buck rivets (Innovations in Stainless DIY tools).
- Cleco pins: temporary fasteners that hold alignment before final riveting; use with a rivet template gauge for consistent spacing (Innovations in Stainless DIY tools).
Step 5: Install your chosen step system
General flow:
- Dry‑fit using the manufacturer’s diagram; verify height selection and hole alignment. If riveting, use Clecos to hold position while you confirm the fit (Innovations in Stainless DIY tools).
- Bolt on per instructions. MORryde systems are engineered for bolt‑on installs with black powder‑coated parts for durability (MORryde catalog).
- Adjust legs/feet on final placement:
- StepAbove uses adjustable feet for uneven terrain (MORryde catalog).
- GlowStep offers infinite leg adjustability and ground anchoring for earth‑to‑RV stability (Torklift Airstream guide).
Callouts:
- If riveting is required, a Marson-style rivet gun with interchangeable mandrels and a spacing gauge helps deliver clean, consistent results (Innovations in Stainless DIY tools).
- For indoor‑stow systems like StepAbove, verify door swing and interior clearance before final torque (MORryde catalog).
Step 6: Test stability and fine-tune adjustments
- Perform a static weight test at mid‑tread; check for wobble, frame flex, or creaks. MORryde markets bounce‑free, wobble‑free stability when correctly installed (MORryde catalog).
- Level and lock feet/legs:
- Adjust StepAbove feet for true, even contact on each pad (MORryde catalog).
- Dial in GlowStep leg heights to achieve earth‑to‑RV, non‑wobble performance (Torklift Airstream guide).
- Add accessories as needed for confidence and comfort (e.g., grab handle, handrail, anti‑slip mats). MORryde’s Grab Handle is a popular add for steadier entry (MORryde catalog).
OEM vs aftermarket trade-offs
OEM (factory-style)
- Pros: Original fit, simplest swap, lowest upfront cost.
- Cons: May flex or bounce over time; slide tracks can rust/bind; hinge wear is common (HorsepowerHub).
Aftermarket
- MORryde StepAbove: Pull‑down, indoor stow, adjustable feet, wobble‑free stability; some models rated 500 lb (MORryde catalog).
- Torklift GlowStep Revolution: Infinite leg adjustability, earth‑to‑RV anchoring, aircraft‑grade aluminum/stainless, glow treads, lifetime warranty (Torklift Airstream guide).
- Air Step Brace: No‑drill stabilizer that reduces sag and wear on two‑step Airstream systems (Air Step Brace overview).
Summary table:
| Option | Stability | Install complexity | Weight capacity | Warranty | Best for |
|---|---|---|---|---|---|
| OEM-style replacement | Moderate (frame-supported) | Low (bolt-on) | Varies by model | Varies | Budget refresh with original design |
| MORryde StepAbove | Very high (indoor stow, adjustable feet) | Medium (bolt-on; door clearance check) | Up to 500 lb on some models | Varies by SKU | Maximum stability and capacity |
| Torklift GlowStep Revolution | Very high (earth-to-RV, infinite legs) | Medium (bolt-on; leg tuning) | Model-specific (aircraft-grade build) | Lifetime (per Torklift) | Campers on uneven ground/night use |
| Air Step Brace | Higher vs OEM alone | Very low (tool-free) | Uses existing step’s rating | N/A | Quick, non-permanent bounce reduction |
Fitment and purchasing guide for Airstream owners
Fitment checkpoints:
- Confirm step type (single/double; sliding tracks vs hinge) and whether you need 2‑ or 3‑step based on your “A” height. GlowStep commonly maps to 21.5 in. and 24.5 in. ranges on Airstreams (Torklift GlowStep fit page).
- Verify bracket inside width and bolt center‑to‑center spacing before ordering (HorsepowerHub).
Where to buy and confirm sizing:
- Manufacturer catalogs/pages: Use the MORryde StepAbove catalog for model specs, capacities, and accessories; use Torklift’s Airstream pages for sizes and add‑ons (MORryde catalog; Torklift Airstream guide).
- Specialty retailers: Look for Airstream‑specific SKUs and tech notes; some GlowStep models even list patent numbers like US 11,807,189 on product pages (Torklift 2‑Step 21.5 in. page).
- Non‑permanent fixes: The Airstream Air Step Brace is sold as a slide‑in stabilizer for two‑step aluminum stairs (Air Step Brace overview). Before purchase, cross‑check your measurements and photos against the fit checklist in this RV Critic guide.
Definition: An earth-to-RV connection uses adjustable legs or supports that contact the ground, transferring load to the earth rather than the trailer frame for a more stable, non‑wobble entry feel.
Safety, stability, and maintenance tips
Safety practices:
- Deploy on level ground when possible; adjust legs/feet until treads are flat and solid.
- Add grip tape or glow accents if not included; GlowStep integrates glow‑in‑the‑dark SureGrip treads for safer night entry (Torklift Airstream guide).
Maintenance checklist:
- Rinse dirt and debris, lubricate pivots per maker guidance, and repaint/coat steel brackets to slow rust (HorsepowerHub).
- Inspect fasteners each trip; re‑torque after the first 100 miles of travel with a new install.
Stability enhancers:
- Use a brace on OEM steps to cut bounce; the Air Step Brace reduces sag without drilling (Air Step Brace overview).
When to DIY and when to hire a pro
DIY-friendly if:
- Your bracket is intact and you’re doing a bolt‑on swap (often four bolts total) (HorsepowerHub).
- You can safely support and align the assembly and have basic torque and anti‑corrosion tools.
Hire a pro if:
- Mounting holes are damaged or the frame needs repair—expect drilling or reinforcement beyond bolt‑on (HorsepowerHub).
- You need rivet‑backed work; buck riveting (two‑person) is stronger than Olympic rivets, and Clecos plus rivet gauges help ensure alignment (Innovations in Stainless DIY tools).
Time estimate: 1–2 hours for a straightforward bolt‑on; longer with bracket remediation or rivet work. If you’re unsure, RV Critic leans toward pro installation for rivet‑backed or structural repairs.
Recommended accessories for added safety and usability
Stability and grip:
- MORryde Grab Handle improves confidence alongside StepAbove systems (MORryde catalog).
- Non‑slip mats or glow edge tape if not using GlowStep (GlowStep’s SureGrip glow treads already cover night visibility; Torklift Airstream guide).
Protection and storage:
- Step covers reduce grit tracked inside.
- If you remove under‑floor steps, consider adding a storage box where the old steps lived; MORryde offers black powder‑coated storage solutions in its ecosystem (MORryde catalog).
Mobility aids:
- Add a compatible handrail; verify mounting per manufacturer instructions.
Frequently asked questions
How do I measure door threshold height and mounting width correctly
Measure from the bottom of the entry threshold to level ground, then record the inside bracket width and bolt hole center‑to‑center spacing. RV Critic’s worksheet above helps prevent ordering the wrong 2‑ or 3‑step size.
Will aftermarket steps fit my Airstream without drilling
Many bolt directly to existing brackets if measurements match, but damaged holes or non‑standard brackets may require minor drilling or rivet work. Check fit charts and your photos; RV Critic advises a pro install if drilling/riveting is needed.
What weight capacity should I target for safer entry
Aim for at least 300–500 lb depending on users and gear. RV Critic suggests choosing the highest capacity that still fits and clears your door.
How do I reduce bounce without replacing the entire step system
Use a removable Airstream Air Step Brace under two‑step aluminum stairs to cut flex and sag without drilling. RV Critic views it as a quick, no‑drill fix between full replacements.
Do new steps affect door clearance or storage inside the trailer
Indoor‑stow pull‑down designs can affect door swing and interior clearance. RV Critic recommends a dry‑fit and door‑operation check before final torque and travel.