Keep Factory Look: Best Concealed Hitch Options for RAV4 XLE
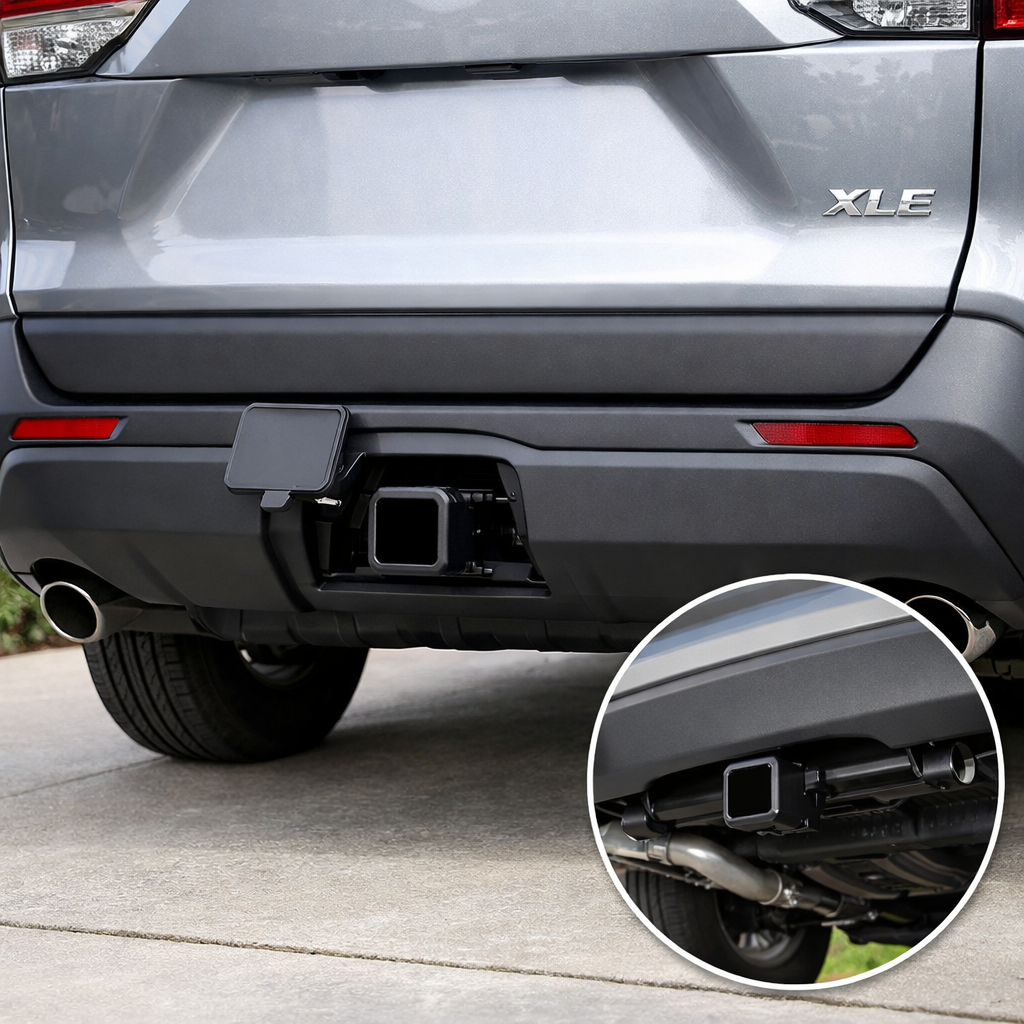
Looking to add towing and rack capability without changing your SUV’s clean lines? The best concealed hitch for Toyota RAV4 XLE owners is one that tucks away the cross tube and preserves ground clearance, while offering a 2-inch Class III receiver for real-world use. “A concealed (hidden) hitch tucks the main cross tube behind the bumper so only the receiver is visible, preserving the SUV’s factory lines and ground clearance while enabling towing and rack use” (see CURT’s trailer hitch selection guide) and related concealed-fit notes in Torklift Central’s EcoHitch overview. Top picks include EcoHitch for the most OEM-like look, Stealth Hitches for fully hidden hardware, and budget-friendlier concealed options from CURT and Draw-Tite.
Benefits at a glance:
- Cleaner appearance that keeps the factory look hitch profile
- Better ground clearance than exposed cross tubes
- Often better sensor and hands-free liftgate compatibility
Comparison snapshot (verify exact fit for your RAV4 XLE year/trim):
| Brand | Visibility when not towing | Materials/finish | Typical rating | Install type/time | Warranty | Price band |
|---|---|---|---|---|---|---|
| EcoHitch | Concealed cross tube; only receiver shows | Stainless receiver with coated steel body | Class III 2-inch; examples up to ~5,000 lb GTW/700 lb TW (vehicle limits apply) | Bolt-on; ~45–90 min; may lower exhaust/remove fascia clips | Lifetime | $$$ |
| Stealth Hitches | Fully hidden; removable receiver leaves no visible hardware | Welded steel, powder-coated; integrated lock | Class II–III systems; 2-inch receiver option | Bolt-on; more steps; pro install recommended if wiring | Lifetime (ownership) | $$$$ |
| CURT (concealed/low-profile) | Concealed or low-profile round-tube; receiver visible | Powder-coated steel | Class II–III 2-inch typical for RAV4 | Bolt-on; ~60–90 min | Limited lifetime on structure | $$ |
| Draw-Tite/Reese (hidden/low-vis) | Varies by part; some trimming or exposed body possible | Powder-coated steel | Class II–III 2-inch typical for RAV4 | Bolt-on; trimming possible; time varies | Limited lifetime on structure | $$ |
RV Critic
We test and recommend with a practical, safety-first, budget-aware lens. For a concealed hitch RAV4 setup, our selection criteria are:
- Factory-look preservation with a hidden or low-visibility design
- Proper class/rating for bikes, cargo carriers, and small trailers
- Preference for no-drill, bolt-on installation and broad installer support
- Corrosion resistance that holds up to weather and road salt
- Strong warranty and readily available parts/accessories
Safety rule we follow—and you should too: always abide by the lowest-rated component in your towing system (vehicle, hitch, ball mount, or coupler), a principle CURT emphasizes across its guidance. We also compare install steps and fitment details on popular crossovers so you can choose with confidence.
EcoHitch
EcoHitch is a top pick for a factory-clean appearance on compact SUVs: the concealed cross tube sits behind the bumper so only the receiver shows, preserving lines and ground clearance. Its stainless receiver resists rust and blends visually, and the brand backs it with a lifetime warranty—made in the USA, with a no-drill, bolt-on approach most DIYers can complete in about 45–90 minutes using basic tools; common steps include lowering the exhaust and removing a few fascia clips (see Torklift Central’s EcoHitch overview). On comparable C‑SUVs, EcoHitch publishes ratings up to 5,000 lb GTW and 700 lb TW; always verify the RAV4 XLE limits and match class accordingly. Concealed designs can help preserve hands-free liftgate sensor function on some models—test and adjust foot placement after install.
Pros:
- OEM-like appearance; only the 2-inch receiver is visible
- Stainless receiver tube for long-term rust resistance
- Lifetime warranty; DIY-friendly bolt-on design
Cons:
- Premium price
- Confirm wiring kit compatibility and trim-specific sensor behavior
Stealth Hitches
If you want the maximum factory look with zero day-to-day hardware on display, Stealth’s fully hidden system sets a high bar: the receiver detaches so nothing is visible, claims no ground-clearance loss, and includes an integrated lock—built in the USA with a lifetime ownership warranty (details at Stealth Hitches). Installation is bolt-on but typically involves more trim steps and time than simpler concealed receivers; if adding wiring or new to panel removal, professional installation is smart.
Fit/value summary:
- Best for drivers who want a pristine bumper line every day
- Trade-offs: higher upfront cost and keeping track of the removable receiver
CURT
CURT offers vehicle-specific concealed and low-profile round-tube hitches that are widely available and often easier on the wallet. CURT defines concealed designs where only the receiver is visible, but also sells exposed round-tube options for years/trims without a hidden fit. Their class guidance runs from Class I (up to ~2,000 lb GTW) to Class V heavy-duty ranges; choose the hitch class for your actual load, not just the vehicle’s published capacity. And remember the safety rule: your system is only as strong as the lowest-rated part. A practical perk: CURT’s wide dealer network and installer familiarity can speed sourcing and fit confirmation for the RAV4 XLE.
Draw-Tite
Draw-Tite/Reese remains a mainstream, installer-friendly choice with both exposed and some hidden solutions. Aesthetics vary: certain part numbers sit lower or require minor bumper trims, while others aim for low visibility—always review photos and instructions for your exact RAV4 XLE year/trim to avoid surprises. When instructions mention cutting or complex alignment, we recommend professional installation to eliminate safety risks. Matching the right hitch class to your intended GTW/TW is critical; installing the wrong class can cause instability or even trailer detachment, as many installer guides caution.
How to choose the right concealed hitch
Use this quick decision flow:
- Confirm your RAV4 XLE’s towing and tongue limits and list your intended loads (bike racks, cargo carriers, small trailers).
- Prioritize a vehicle-specific concealed/hidden design to preserve the bumper line and clearance.
- Match hitch class to GTW/TW and defer to the lowest-rated component in the system.
- Decide DIY vs. pro install based on tools, time, and whether wiring is required.
- Compare materials, finishes, and warranties for long-term value and rust resistance.
Fitment and trim compatibility
A vehicle-specific fit means the hitch is engineered to the RAV4’s frame, bumper contours, and mounting points for bolt-on alignment that can better preserve sensors and hands-free liftgate operation with minimal or no trimming. To confirm your exact model year and XLE trim, check the etrailer fit guide before ordering. Concealed cross tubes typically keep the OEM look and may better preserve liftgate sensors compared with exposed bodies—test after install.
Towing class and weight ratings
Gross Trailer Weight (GTW) is the total trailer plus cargo; Tongue Weight (TW) is the downward force on the hitch. Choose the smallest class that safely covers your real load and never exceed the lowest-rated component. CURT’s class context runs from Class I (~2,000 lb GTW) up to Class V heavy-duty ranges; most RAV4 hidden hitch RAV4 XLE solutions fall in Class II–III. EcoHitch examples on similar compact SUVs reach up to ~5,000 lb GTW/700 lb TW, but you must verify your RAV4 XLE’s specific limits before towing.
Materials and corrosion resistance
A stainless receiver is a receiver tube made of corrosion-resistant stainless steel that maintains function and appearance longer than painted carbon steel in harsh, salty climates. Powder-coated carbon steel remains common and durable; stainless or aerospace-grade components (as emphasized with EcoHitch) enhance corrosion resistance, while Stealth relies on welded construction and robust powder coat. Accessories like heavy-duty ball mounts often use black powder coat for rust/UV resistance; some aluminum options reduce weight while maintaining strength, a theme highlighted in many hitch accessory roundups.
Install difficulty and wiring
Many concealed systems are no-drill, bolt-on installs doable with basic tools in about 45–90 minutes—EcoHitch is a frequent example. If instructions mention trimming, complex alignment, or you’re adding trailer wiring, professional installation is recommended to avoid safety and sensor issues, a point echoed by installer comparisons. For wiring, use a plug-in T-connector harness matched to your RAV4’s tail lights, route away from pinch points, and test all functions (running, brake, turn) before towing.
Budget and warranty
Fully hidden or stainless-equipped systems cost more but often include lifetime or ownership-length warranties (EcoHitch and Stealth). Factor accessories into your budget: 2-inch receiver mounts can be found at budget prices (e.g., adjustable drop hitches around the $60 range), but weigh anti-theft features and weight trade-offs. Value tip: some aftermarket concealed hitches can outperform factory options on specs and coverage—compare ratings and warranties before you buy to stretch your dollars.
Installation and safety notes
- Follow the torque specs in the hitch instructions; recheck torque after your first trip.
- Obey the lowest-rated component in your setup (vehicle, hitch, ball mount, coupler).
- If trimming or wiring is involved and you lack tools/experience, use a professional installer.
- After mounting, verify hands-free liftgate and parking sensors; adjust foot placement or sensor sensitivity as needed.
- Use a quality 2-inch accessory and consider an anti-rattle device for quieter bike racks and cargo carriers.
- Check safety chains, pin-and-clip/lock engagement, and light functions before every tow.
Frequently asked questions
Do concealed hitches require bumper cuts on the RAV4 XLE?
Many concealed hitches hide the cross tube so only the receiver shows, often avoiding obvious bumper cuts; RV Critic recommends checking the install guide for your exact year/trim to confirm any trimming.
Will a hidden hitch affect ground clearance or liftgate sensors?
Concealed designs typically maintain ground clearance and may better preserve hands-free liftgate sensors. RV Critic recommends testing the liftgate sensor after install and adjusting foot placement as needed.
What hitch class and tongue weight do I need for bikes or a small trailer?
For bike racks and small utility trailers, a Class II–III concealed hitch with a 2-inch receiver is common. RV Critic’s guidance: match GTW/TW to your actual load and defer to the lowest-rated component.
Can I install a concealed hitch myself without drilling?
Many concealed hitches are bolt-on/no-drill and doable with basic tools in under 90 minutes. RV Critic suggests professional installation if wiring or trimming is involved to ensure alignment and safety.
Does adding a hitch affect my Toyota warranty?
A properly installed aftermarket hitch doesn’t automatically void your warranty; RV Critic recommends keeping documentation and following manufacturer instructions.