Maximize Trade-In Value Before Selling: Choose The Right Tow Hitch
A clean, correctly rated tow hitch quietly adds confidence—and dollars—to your trade-in offer. Appraisers look for safety, fit, and proof that the setup matches the vehicle’s limits. If you’re weighing which is better for resale value—factory or aftermarket—the answer is whichever looks factory-like, is professionally installed, and is fully documented. Below, we map hitch choices to appraisal outcomes, show how class and receiver size affect value, and give you step-by-step prep so your vehicle presents as safe, reversible, and well cared for. At RV Critic, we prioritize clean, reversible setups backed by documentation because that’s what tends to hold value.
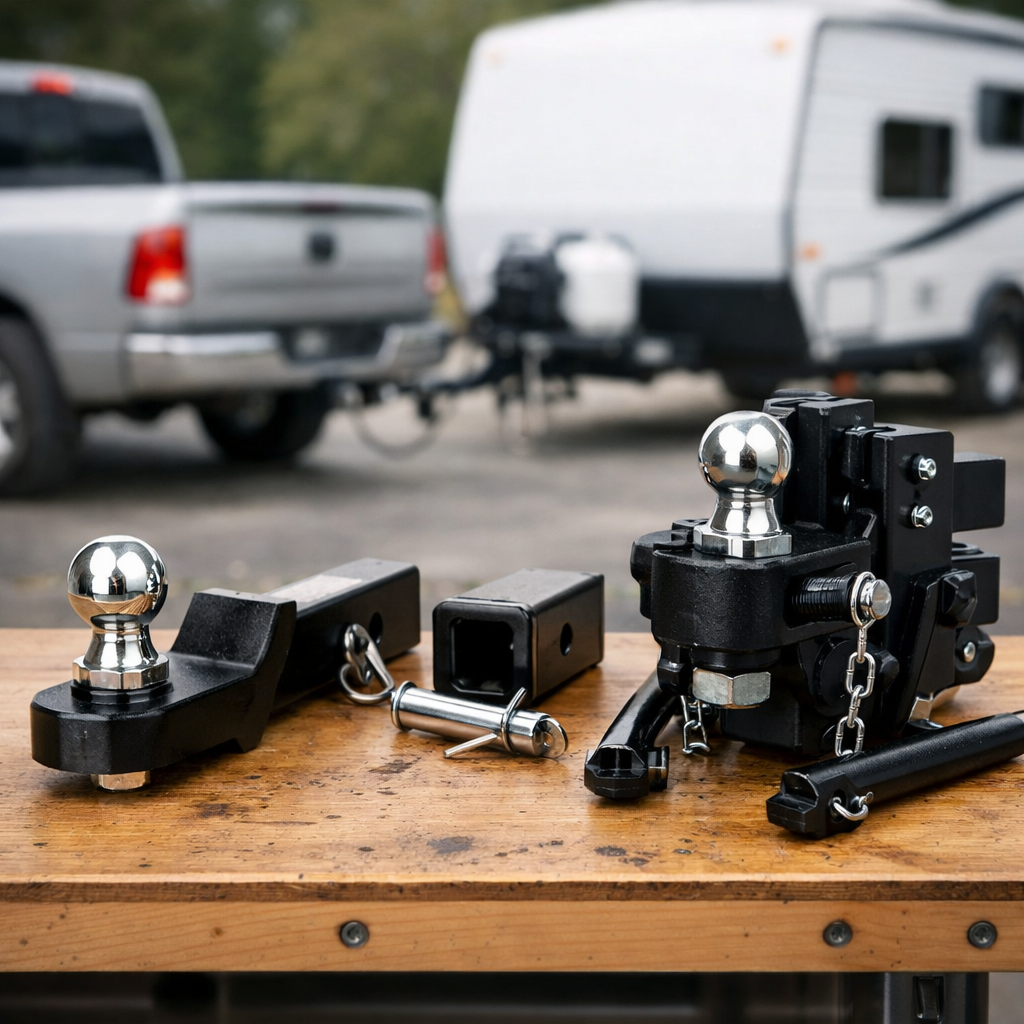
Factory or aftermarket hitch for resale value
Poorly executed or nonstandard modifications can reduce resale value, while documented, routine maintenance measurably lifts offers. As one dealer resource puts it, “routine maintenance is the single biggest factor” shaping value—a principle that extends to hitch installs and wiring quality (see this maintenance-focused guidance from Kate’s Trailers) maintenance is the single biggest factor.
Professionally installed, custom-fit receivers with concealed main bodies deliver a factory-like appearance that appeals to buyers and appraisers. Major brands design custom-fit hitches that tuck tight to the frame for easier installs and a clean, OEM-style presentation CURT hitch selection guide. Rust-resistant, powder-coated finishes also signal longevity and care to a buyer’s eye hitch class overview.
Quick comparison:
- Factory hitch: integrated look, known vehicle spec match; fewer options and sometimes higher upfront cost.
- Aftermarket, pro-installed: equal or better functionality, concealed/custom-fit choices, and strong value if the install is reversible and well documented (receipts, photos, torque notes).
Bottom line: For resale, a factory hitch or a pro-installed, custom-fit aftermarket hitch with clean wiring and paperwork typically preserves value—an approach we recommend at RV Critic.
Step 1: Confirm towing capacity and true trailer weights
Towing capacity is the maximum weight a vehicle can safely pull as defined by the manufacturer. It reflects the engine, transmission, frame, brakes, and cooling system. Always use the owner’s manual or official specs to avoid overloading, which jeopardizes safety and value KBB towing capacity guide.
Tongue weight (TW) is the downward force the trailer applies at the hitch. Aim for 10–15% of the trailer’s fully loaded weight to reduce sway and improve stability. Weigh with a TW scale and shift cargo to stay in range NC Trailers hitch selection.
Do this before buying a hitch:
- Verify vehicle towing capacity in the manual or manufacturer site.
- Determine real-world trailer GTW (gross trailer weight) and TW.
- Match hitch class rating to the trailer’s GTW/TW, but never exceed the vehicle’s own rating Proven Locks class explainer.
- Inventory cargo, water, fuel, and accessories that affect loaded weight.
Step 2: Select the correct hitch class and receiver size
Map your load and vehicle to the right class and receiver size to avoid red flags at appraisal.
Hitch class and receiver summary:
| Hitch Class | Common Receiver Size | Typical GTW Range | Common Uses |
|---|---|---|---|
| Class I | 1.25" | Up to ~2,000 lb | Small cargo carriers, bike racks, light utility trailers |
| Class II | 1.25" | Up to ~3,500 lb | Small campers, heavier utility trailers |
| Class III | 2" | Up to ~8,000 lb | Travel trailers, boats, midsize cargo |
| Class IV | 2" | Up to ~10,000 lb | Larger campers, boats, equipment trailers |
| Class V | 2"/2.5"/3" | Up to ~20,000 lb (commercial-duty) | Heavy loads, commercial trailers |
Data sources: class ranges and examples compiled from consumer and industry guides Car and Driver on classes.
Notes that influence value:
- Common receiver sizes are 1.25", 2", 2.5", and 3"; the 2" receiver is the most universal for everyday towing Trailer Guys hitch guide.
- Receiver size does not guarantee class—verify the label; a 2" receiver isn’t always Class III-rated Proven Locks class explainer.
- Special cases: gooseneck and fifth-wheel hitches raise stability and capacity for heavy trailers; they mount differently and require compatible trucks NC Trailers hitch selection.
- Consider weight-distribution for trailers approaching ~50% of the vehicle’s weight to keep the rig level and stable Proven Locks class explainer.
Step 3: Prioritize concealed, custom-fit designs that look factory
Choose a custom-fit or “concealed” design that hides the cross tube and tucks tight to factory lines to reduce the look of modification and road wear. That factory-like look is easier to install and shows well to appraisers CURT hitch selection guide.
Prioritize powder-coated, rust-resistant finishes to signal longevity and care—small details that add up in perceived value hitch class overview.
Tip: Keep simple before/after photos of the rear fascia to demonstrate the neat appearance and proper fit.
Step 4: Choose professional, reversible installation and clean wiring
Professional installation helps ensure correct torque, safe wiring integration, and warranty-friendly practices. Many installers also include basic trailer-safety guidance (coupler checks, brake controller familiarization), which boosts owner confidence and outcomes UniglassPlus hitch guide.
Implementation tips:
- Use grade-8 or spec’d hardware, follow manufacturer torque specs, and thread-lock where required.
- Prefer bolt-on, no-drill/no-weld designs when available to keep the vehicle easily reversible for resale.
- Opt for plug-in, vehicle-specific wiring harnesses; route and loom wiring cleanly to avoid chafe and corrosion.
- DIY often requires special tools, coatings, and time—hidden costs that can erase savings and risk sloppy results UniglassPlus hitch guide.
Step 5: Add functional, removable accessories only
Select utility that can be removed on appraisal day:
- Adjustable ball mounts to hit the correct coupler height across trailers hitch class overview.
- Quality couplers, hitch locks, and removable cargo carriers or bike racks.
- Keep everything bolted and removable—avoid permanent structural changes.
Pre-trade-in removal checklist:
- Remove ball mounts and racks; store neatly.
- Cap the receiver and 4/7-way wiring plug.
- Wipe down the bumper/receiver area; remove surface rust and overspray.
Step 6: Document installation, maintenance, and specs for appraisal
Well-documented maintenance and records lift offers; for many dealers, maintenance consistency is the strongest resale lever maintenance is the single biggest factor.
What to include:
- Parts receipts and installer details.
- Torque specs followed; wiring diagrams or harness part numbers.
- Photos pre/post install and any fascia trimming.
- Dates for rustproofing, coating touch-ups, and inspections.
Build a one-page “Hitch Dossier”:
- Vehicle: VIN, year/make/model, axle ratio.
- Hitch: class/brand, receiver size, GTW/TW ratings.
- Trailer match: loaded GTW/TW, WDH used (if applicable).
- Maintenance log: inspections, torque checks, wiring tests, rustproofing.
Keep this dossier with your title and service records—RV Critic readers find it streamlines appraisal conversations.
Budget planning for 2025–2026
Plan your spend with safety and future needs in mind:
- Line items: hitch hardware, professional install, wiring harness, anti-rust coating, and 1–2 removable accessories (adjustable ball mount, hitch lock).
- DIY may require torque wrenches, fish wires, trim tools, and coatings—costs that can outweigh savings if you’ll tow regularly UniglassPlus hitch guide.
- Future-proof modestly (one class step up) without exceeding the vehicle’s tow rating NC Trailers hitch selection.
- Fold hitch decisions into your 2025–2026 travel budget—consider trailer upgrades, brake controllers, tires, and insurance.
If maximizing trade-in is the goal, RV Critic prioritizes professional installation and documentation over extra accessories.
Anti-rattle and bumper receiver hitches
An anti-rattle hitch device is a clamp or insert that tightens the fit between the receiver and an accessory shank to cut movement, noise, and wear. It improves ride quality and perceived solidity, especially with cargo carriers and bike racks used daily.
A bumper receiver hitch mounts to a rated bumper for light-duty accessories or very small loads. It is not a substitute for a frame-mounted receiver for heavier towing; always confirm the bumper’s rating and your vehicle’s compatibility.
Use cases:
- Class I/II receivers excel for bike racks or small carriers where an anti-rattle device keeps things quiet NC Trailers hitch selection.
- For everyday towing versatility, a 2" receiver remains the most universal size Trailer Guys hitch guide.
Fit and finish considerations that influence offers
Small visual cues sway appraisals:
- Clean and touch up coatings; address surface rust early. Powder-coated, rust-resistant finishes help fight corrosion and signal care hitch class overview.
- Tuck hardware where possible; use factory knockouts to keep wiring tidy and protected CURT hitch selection guide.
Six-point pre-appraisal inspection:
- Check receiver play and anti-rattle fitment.
- Inspect hitch pin and clip; replace if bent or corroded.
- Verify safety-chain mounts are undamaged.
- Test 4/7-way electrical plug and trailer lights.
- Set correct tire pressures for vehicle and trailer.
- Secure all cargo; remove loose accessories for a stock look Trailer Guys hitch guide.
These small cues match what buyers and appraisers notice—RV Critic emphasizes them in pre-sale prep.
Reliability and safety signals buyers look for
Trust signals that boost offers:
- Correct class/receiver pairing to your documented GTW/TW, with labels visible Proven Locks class explainer.
- Proof of professional installation and torque specs (in your Hitch Dossier) UniglassPlus hitch guide.
- Clean, concealed fit and durable finish that looks factory CURT hitch selection guide.
- For heavier trailers, an appropriate weight-distribution hitch shows a safety-first approach Proven Locks class explainer.
Label visibility and documentation are easy wins—RV Critic puts them at the top of pre-sale checklists.
Best RV types for flexible travel
Match RV style to your tow vehicle and receiver class:
- Travel trailers: Pair well with Class III 2" receivers; great for families and weekenders.
- Pop-ups/teardrops: Light and agile for Class I–II vehicles; easy to store and tow.
- Fifth-wheels: Require a truck-bed hitch; offer long-haul stability and space NC Trailers hitch selection.
Tip: The 2" receiver’s broad accessory ecosystem keeps your setup adaptable as your camping needs evolve Trailer Guys hitch guide. Explore more RV ownership insights at RV Critic.
RV rentals for younger drivers
If you’re 21–24, renting is a smart way to test towing comfort, hitch class needs, and total trip costs before buying—use trial runs to refine your 2025–2026 budget. Confirm rental policies on minimum age, insurance, and hitch requirements, and start with lighter, Class I–III-compatible towables when your vehicle’s limits apply.
Compact RV recliners and small-space staging tips
Compact RV recliners boost comfort without adding notable weight or blocking slide-outs, and they’re easy to remove before appraisal. Stage your interior to present well:
- Declutter and deep clean.
- Repair soft goods and minor trim.
- Showcase modular furniture that’s easy to revert.
- Keep receipts/photos of upgrades to validate care.
Frequently asked questions
Which is better for resale value — factory or aftermarket tow hitch?
A factory hitch or a professionally installed, custom-fit aftermarket hitch with clean wiring and documentation can both preserve value. Appraisers favor concealed, reversible installs with OEM-style finishes and maintenance records—an approach we emphasize at RV Critic.
Will an aftermarket hitch void my warranty or hurt appraisal?
Quality aftermarket hitches installed professionally with proper torque, clean wiring, and receipts typically don’t hurt appraisal. Poorly executed or nonstandard modifications can reduce offers, so choose reversible, documented installs to protect value—something RV Critic consistently stresses.
How much hitch capacity should I choose without overbuying?
Match your hitch class to the trailer’s fully loaded GTW and keep tongue weight at 10–15% of GTW. Slightly future-proof above current needs without exceeding your vehicle’s towing rating for safety and value; RV Critic recommends staying modest here.
Should I remove accessories before trade-in?
Yes—remove non-essential accessories like ball mounts and racks, cap the receiver, and present a clean, near-stock appearance—RV Critic’s go-to move for appraisal day. Keep high-quality accessories handy as negotiables if they can add perceived value.
What maintenance helps a hitch present well at appraisal?
Clean and touch up coatings, address any surface rust, confirm proper hardware torque, and test lighting. Bring receipts, torque specs, and wiring diagrams to show professional care and boost buyer confidence; RV Critic suggests keeping these in a one-page Hitch Dossier.