Roadside Assistance vs DIY: Best Move When Your RV Breaks Down
Quick answer and safety first
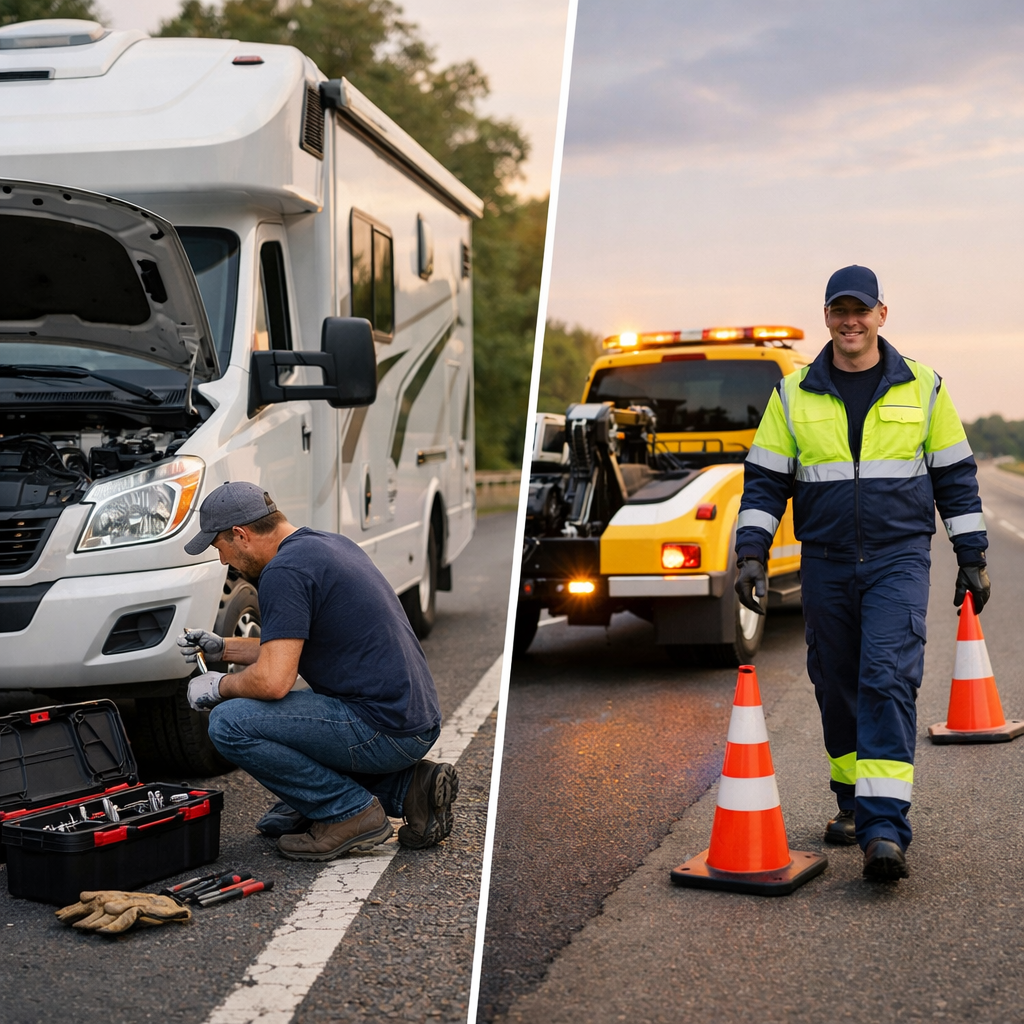
First, protect people—then protect the rig. If you can, steer fully onto the shoulder or an exit, switch on hazard lights, set reflective triangles or cones, and stay well away from traffic. Roadside pros secure scenes with warning lights and cones to reduce exposure risk, which is why many insurers recommend using them when possible (see State Farm’s guidance on roadside safety). For anything beyond a simple, low‑risk task you’re trained and equipped to do, call roadside assistance; DIY only when it’s simple, safe, off the live roadway, and you have the right tools and know-how, a rule of thumb echoed by guidance comparing DIY vs. professional help. RV Critic’s stance: if you’re unsure, call.
How we compare roadside assistance and DIY
At RV Critic, we use four criteria to guide your choice: safety risk, complexity and tools required, coverage and plan limits, and total cost/time to resolution.
Roadside assistance, defined: A service that dispatches trained technicians to stranded drivers for towing, tire changes, jump starts, fuel delivery, lockouts, and minor on‑scene repairs—typically 24/7—with specialized tools, safety protocols, and insurance-backed protections that reduce roadside exposure and damage risk.
Comparison at a glance:
| Task | Risk at roadside | Equipment needed | DIY when… | Choose roadside assistance when… |
|---|---|---|---|---|
| Flat tire | Moderate–high (traffic, heavy wheels) | RV‑rated jack, breaker bar, torque wrench, chocks, spare | You’re well off-road, have an RV-rated jack/chocks, and know torque specs | You’re on a narrow shoulder, lack tools, or have duals/large Class A tires |
| Dead battery | Low–moderate | Heavy-gauge cables or jump pack, PPE | You can park safely and connect correctly | It’s dark/bad weather, access is tight, or there’s electrical uncertainty |
| Out of fuel | Low–moderate | Gas can, funnel | You’re close to fuel and in a safe area | You’re on a highway/bridge or far from services; request fuel delivery |
| Lockout | Low | Spare key, lockout tool | You have a spare key accessible | You lack tools/experience; avoid prying that can damage seals/paint |
| Overheating | Moderate | Coolant, gloves, rags | You’re off-road, engine cooled, and only topping up | Temperature spikes, leaks, steam, or unknown cause—get a tow |
| Electrical fault | Moderate–high | Multimeter, fuses, diagrams | Only to replace a known blown fuse | Multiple systems failing or burning smell—call a pro |
| Engine/transmission issue | High | Diagnostic tools | Rarely DIY roadside | Any drivability issue, knocking, slipping—tow to a qualified shop |
| Stuck/winch needed | High | Recovery gear, training | Only on firm, safe terrain with experience | Any soft ground, embankment, or traffic exposure—request winching |
| Brake/suspension issue | High | Specialty tools | Not recommended roadside | Always call for a tow or mobile mechanic |
What roadside assistance includes
Most RV roadside plans cover:
- Towing to a repair facility (often to the nearest qualified shop).
- Tire changes using your spare.
- Fuel delivery when you run out.
- Lockout service without damaging seals or glass.
- Jump start service or battery boost.
- Minor on‑scene repairs or adjustments.
These services are typically available 24/7, and trained techs often diagnose and resolve issues faster and more safely with purpose-built tools and procedures, helping minimize roadside time, as emphasized by professional roadside providers and major insurers. RV Critic favors plans that clearly state RV-capable towing and realistic response times.
What DIY realistically covers
DIY is best reserved for quick, low-risk wins when you’re safely off the roadway:
- Changing to a spare tire with an RV‑rated jack, wheel chocks, and proper torque sequence.
- Jump-starting with a heavy‑duty jump pack or cables, following correct polarity.
- Topping off coolant after the engine cools, or replacing a blown fuse you’ve identified.
Attempting complex repairs without the right tools or training can worsen the damage, increase liability, and create significant safety risks at the roadside—especially in traffic or poor weather. RV Critic’s guidance: rehearse these basics at home and time-box any roadside attempt.
Safety and risk profile
Make safety your deciding lens:
- Exposure matters: Work time on a highway shoulder or in bad weather multiplies injury risk, while professional responders reduce time spent roadside and secure scenes using protocols and warning devices.
- Vehicle complexity: Modern RV chassis and electronics raise the odds of misdiagnosis and accidental damage; leave electrical faults and driveline issues to pros.
- Quick risk check:
- Traffic speed and volume (over 45 mph is high risk)
- Shoulder width (narrow or soft shoulder = high risk)
- Visibility (curves, hills, night, rain/fog)
- Weather (wind, ice, extreme heat)
- RV size/class (A/C motorhomes and heavy trailers increase hazard)
RV Critic’s decision tools weigh these factors first.
Cost and time tradeoffs
- Typical per-service costs: A pay‑per‑use jump, tire change, or fuel delivery often runs about $75–$150, while annual plans or insurance add‑ons trade a yearly fee for lower incident costs and coverage breadth (see an overview of roadside coverage and pricing ranges in the Ocho coverage guide).
- Behavior trend: Even though about 85% of drivers have some roadside coverage, research shows barely half actually call for help—many default to DIY for perceived speed or cost savings (Agero’s consumer insights).
- Quick calculator:
- Break‑even estimate = Annual plan fee ÷ Expected incidents per year.
- If your travel pattern suggests 1+ incidents/year or you drive a large RV, plans with towing benefits often pencil out.
This is the same quick math RV Critic uses in plan comparisons.
Coverage limits and plan types
Where roadside coverage comes from:
- Manufacturer coverage (often 3–5 years on new rigs)
- Insurance add‑ons
- Auto clubs and membership programs
- Credit cards with reimbursement benefits
- Standalone RV roadside plans
Key limits to check before you buy:
- Towing distance caps and “nearest qualified facility” rules
- Service area and off‑road restrictions
- Per‑incident dollar or call limits
- RV class/weight constraints and whether mobile mechanics are included
- Travel benefits like trip interruption or lodging reimbursement
RV Critic’s side‑by‑side comparisons focus on these specifics so you know exactly what’s covered.
When to choose DIY
DIY makes sense only when all of the following are true:
- You’re safely off the road with wide clearance and good visibility.
- The fix is simple (spare tire swap, jump start, topping fluids).
- You have the correct roadside tool kit and the confidence to use it.
- A quick mini-flow:
- Stabilize the scene (hazards, chocks, triangles).
- Diagnose basics (battery, fuses, obvious leaks).
- Execute the quick fix within a defined time box.
- Recheck safety and vehicle status.
- If conditions worsen or the issue points to electrical/chassis/towing needs, stop and call for help.
When to call roadside assistance
Call immediately if you’re on a high‑speed road, in poor weather or at night, face electrical faults, transmission/engine problems, need wheel‑lift/winching, or require large‑vehicle towing. Professional technicians are insured, trained, and equipped to protect your RV and reduce roadside exposure time, a core advantage highlighted by major insurers and towing providers. When in doubt, RV Critic errs on the side of calling.
Towing and large RV considerations
Large motorhomes (Class A/B/C) and heavy trailers need operators trained in RV towing, plus specialized wreckers, hitches, and brake system know‑how. Modern multiplexed electronics and chassis systems further complicate amateur troubleshooting; remote or complex failures merit professional transport and diagnosis. RV Critic recommends confirming RV‑capable providers along your route before you roll.
Towing readiness checklist:
- Know your rig’s GVWR/GCWR, length, and height
- Hitch type and ratings (weight distribution, fifth‑wheel, gooseneck)
- Brake system type and breakaway function
- Tire size/torque specs and jack points
- Nearest RV‑capable service locations along your route
Impact on warranties and liability
Improper roadside methods—like incorrect jacking points, unsafe lifting, or battery mishandling—can damage components and potentially jeopardize warranty coverage. By contrast, roadside assistance providers and technicians carry insurance and follow documented procedures, which reduces repair risk and your financial exposure if something goes wrong. RV Critic also recommends documenting any roadside work for your warranty records.
What to do immediately during a breakdown
- Pull off safely, turn on hazard lights, set triangles or cones.
- Exit and assess from the passenger side, away from traffic.
- Decide DIY vs. assistance based on risk and task complexity.
- Call roadside assistance if anything feels unsafe or complex.
- Wait in a safe spot away from the roadway until help arrives.
Professional responders use approved safety protocols and equipment, which shortens roadside time and improves scene safety. RV Critic’s checklist mirrors those protocols for DIYers.
Preparing your RV emergency kit
Pack for quick fixes and safe waiting:
- Core items: heavy‑gauge jumper cables or jump pack, LED flashlight with extra batteries, basic tool set, tire gauge, bungee cords, seatbelt cutter/window punch, first‑aid kit (see a detailed kit breakdown from a safety-focused guide).
- RV‑specific adds: wheel chocks, reflective triangles, high‑capacity air compressor, RV‑rated jack and boards, spare fuses, coolant, nitrile gloves, rain gear, and a reflective vest. A compact pre-built kit can jump-start your prep, but practice using each item.
- Remember: DIY readiness helps, but the right equipment and familiarity matter as much as the gear itself—plan coverage accordingly using a roadside coverage overview.
RV Critic’s printable packing list can help you verify gear before each trip.
Decision checklist for RV owners
Use this quick roadside decision tree:
- Are you fully off the live lane with wide shoulder and good visibility? If no → Call roadside assistance.
- Is weather/lighting safe (daytime, dry, clear)? If no → Call roadside assistance.
- Is the issue simple (spare tire, jump start, top fluids) and are you equipped? If no → Call roadside assistance.
- Any signs of electrical, engine/transmission, brake, or suspension faults? If yes → Call roadside assistance.
- Need towing, winching, or Class A/C support? If yes → Call roadside assistance.
- Otherwise, proceed with basic DIY, reassessing safety every few minutes.
Road travel remains popular—about 1.95 billion trips in 2024—so an RV Critic printable checklist and a right‑sized plan can pay off for frequent travelers (see Good Sam’s roadside assistance overview for context).
Frequently asked questions
Is RV roadside assistance worth it compared with handling breakdowns yourself?
Yes for most owners; it reduces safety risks, covers towing and complex faults, and often saves time and damage. Use RV Critic’s quick decision checklist to decide when DIY fits.
What does RV roadside assistance usually cover versus DIY tasks?
Plans commonly include towing, tire changes, jump starts, fuel delivery, lockouts, and minor repairs. DIY realistically covers basics like a spare change, jump-start, or topping fluids—only with the right tools and safe conditions, and RV Critic outlines both in our guides.
Do I need an RV‑specific roadside assistance plan?
Often, yes. Many auto plans don’t handle RV weight/size or provide RV‑capable towing, so choose a plan that explicitly covers your RV class, towing limits, and travel area—RV Critic’s comparisons call out these limits.
How far will they tow my RV and are there mileage limits?
It depends on the plan. Some tow to the nearest qualified shop; others offer set mileage or unlimited towing—verify distance caps, “nearest facility” rules, and per‑incident limits, which RV Critic recommends checking before you travel.
What information should I have ready when I call for help?
Share your exact location, RV class and weight, symptoms, membership or policy number, and any safety hazards so dispatch can send the right equipment fast. RV Critic’s call sheet template covers these details.