RV Emergency Help Guide: Contacts, Tools, and Steps That Work
Travel days are smoother when you know exactly how to get help. This RV Critic guide keeps it simple: in an RV emergency, your first call for life-threatening issues is 911; for breakdowns, use an RV-specific roadside assistance plan and share precise GPS coordinates. When cell service fails, personal locator beacons and satellite messengers bridge the gap so rescuers can still find you, even off-grid, as highlighted in Good Sam’s remote travel safety tips. A simple prep system—contacts ready, a grab-and-go bag at the door, off-grid comms, and a compact toolkit—turns chaos into a clear plan you can follow anywhere.
What to do first in an RV emergency
- Assess hazards. Look for fire, fuel leaks, downed lines, moving traffic, or rising water.
- Move people and pets. Create distance from hazards; position upwind and uphill if possible.
- Call 911 for life-threatening issues. Use a PLB or satellite device if you have no cell coverage (see Good Sam’s remote travel safety tips).
- Secure the area. Set hazards/triangles, shut utilities only if safe, and keep bystanders clear.
- Communicate. Share exact location, RV type/length, and what help you need.
“Immediate safety” means removing people and pets from active hazards (fire, floodwater, downed lines), then contacting emergency services—before handling equipment or property. Print this RV Critic checklist and keep it by the main exit.
Build your essential contact list
Create two versions: a laminated card in the RV and a phone Notes list with tappable numbers. Include county and campground contacts, insurer, RV roadside plan, heavy-duty towing, nearest repair shop/tech, tire shop, and nearest hospital/urgent care. Weather alerts are typically issued by county—confirm your campground’s county so you receive the right warnings (see the Workamper emergency preparedness guide). Print the contact table in this RV Critic guide and save a screenshot to your phone for offline use.
Table: keep this handy in both print and phone form.
| Contact | When to call | Info to have ready |
|---|---|---|
| 911 | Any life-threatening emergency | GPS coordinates, nearest cross street/mile marker, site number |
| County emergency management (non-emergency) | Local alerts, evacuation updates, disaster info | County name, current location, callback number |
| Campground office/security | On-site issues, directions for responders, gate access | Site number, park map, gate codes |
| RV insurer (claims) | Accidents, damage, flood/fire loss | Policy number, VIN, photos, time/place |
| RV roadside assistance | Breakdowns, blowouts, winching, fuel/battery/lockout | Plan number, rig length/height/weight/class, hitch type |
| Heavy-duty towing provider | Class A/C or large trailer tows, recoveries | Tow need (flatbed/wheel-lift), tongue/axle weights |
| Mobile RV tech/repair shop | Electrical/plumbing/appliance issues | Problem summary, part numbers if known |
| Tire shop (mobile if possible) | Blowouts, tire replacements, rotations | Tire size/load rating, wheel torque spec |
| Hospital/Urgent care | Medical incidents | Directions, insurance card |
911, local county, and campground staff
Dial 911 first for life-threatening situations. Then use county emergency or non-emergency numbers for localized guidance, and notify the campground office/security so they can direct responders to your site. Carry a battery-powered or hand-crank weather radio to receive alerts when power and cell networks fail, as recommended in the Workamper emergency preparedness guide.
A county emergency management office coordinates local disaster alerts, evacuations, sheltering, and response resources. Saving its phone number and website helps RVers receive area-specific warnings (often issued by county) and guidance for wildfires, floods, and severe storms while traveling.
RV insurer, roadside plan, and heavy‑duty towing
An RV-specific roadside assistance plan better matches the unique needs of RV travelers than standard car coverage. Record policy and plan numbers, VIN, rig length/height/weight/class, and hitch type. For larger rigs or recoveries off soft shoulders, request heavy-duty towing capacity to reduce damage risk and delays. Keep photos of license plates and hitch labels in your phone for faster dispatch.
Nearby repair shops and medical options
Pre-pin the nearest mobile RV tech, repair shop, tire shop, and hospital/urgent care along your route. Print physical directions for off-grid travel and note after-hours availability. Mini-checklist: shop phone number, hours, services (tires, electrical, plumbing), and distance.
Pack a grab‑and‑go emergency bag
A ready “bug-out bag” at the main exit speeds evacuation and makes claims easier to handle—many RVers call it priceless during real emergencies. Aim for one small, labeled backpack per adult plus a pet kit; refresh it seasonally and after any trip where you dipped into supplies.
IDs, insurance, and rig documents
Include driver’s licenses, passports, insurance cards, registration, titles/copies, roadside and insurer policy numbers, and current prescriptions. Scan everything to secure cloud storage and keep physical copies in the bag; waterproof them and store a spare set in the tow vehicle. A waterproof, grab-ready container prevents paperwork loss during storms and leaks.
Medications, pet records, and essentials
Pack 7–14 days of medications, printed prescriptions, an allergy list, and a compact first aid kit. Include pet vaccination records, a spare leash, three days of pet food/water, and waste bags. Add comfort and utility items—emergency blankets, a headlamp/flashlight with spare batteries, and a small kitchen-ready cache: shelf-stable food, a manual can opener, and a lightweight pot/pan—as outlined in the Oliver Travel Trailers emergency essentials list.
Waterproof storage and digital backups
Use IPX-rated dry bags or hard waterproof cases with silica packs, labeled with your name and contact info. Back up scans to an encrypted cloud plus a password manager; keep an offline USB key in the bag. Flood readiness includes waterproofing documents and photos so claims don’t stall later.
Carry communications that work off‑grid
PLBs and satellite messengers fill coverage gaps when phones fail. Use a PLB for true emergencies needing rescue; use a satellite messenger or phone for two-way coordination with family, roadside, or medical providers.
“A personal locator beacon (PLB) is a handheld distress device that, when activated, transmits your location to rescuers via satellite—crucial when cell service is unavailable.”
Personal locator beacons and satellite messengers
A PLB transmits your GPS position and a distress signal to rescuers when cell service isn’t an option; models vary in battery life and registration requirements, while satellite phones and messengers add two-way texting/calling for coordination (see the RV emergency accessories overview). Familiar examples include compact PLBs like the ACR ResQLink and popular two-way messengers; choose what fits your trip profile and budget.
Weather alerts and GPS location sharing
Carry a battery-powered or hand-crank weather radio for outage-proof alerts. Save GPS coordinates and mile markers in your notes; carry physical maps and printed hospital directions when heading off-grid. To share a precise pin: open your map app, drop a pin at your location, copy the coordinates, and include them with highway/mile marker or campsite number when you call roadside or 911.
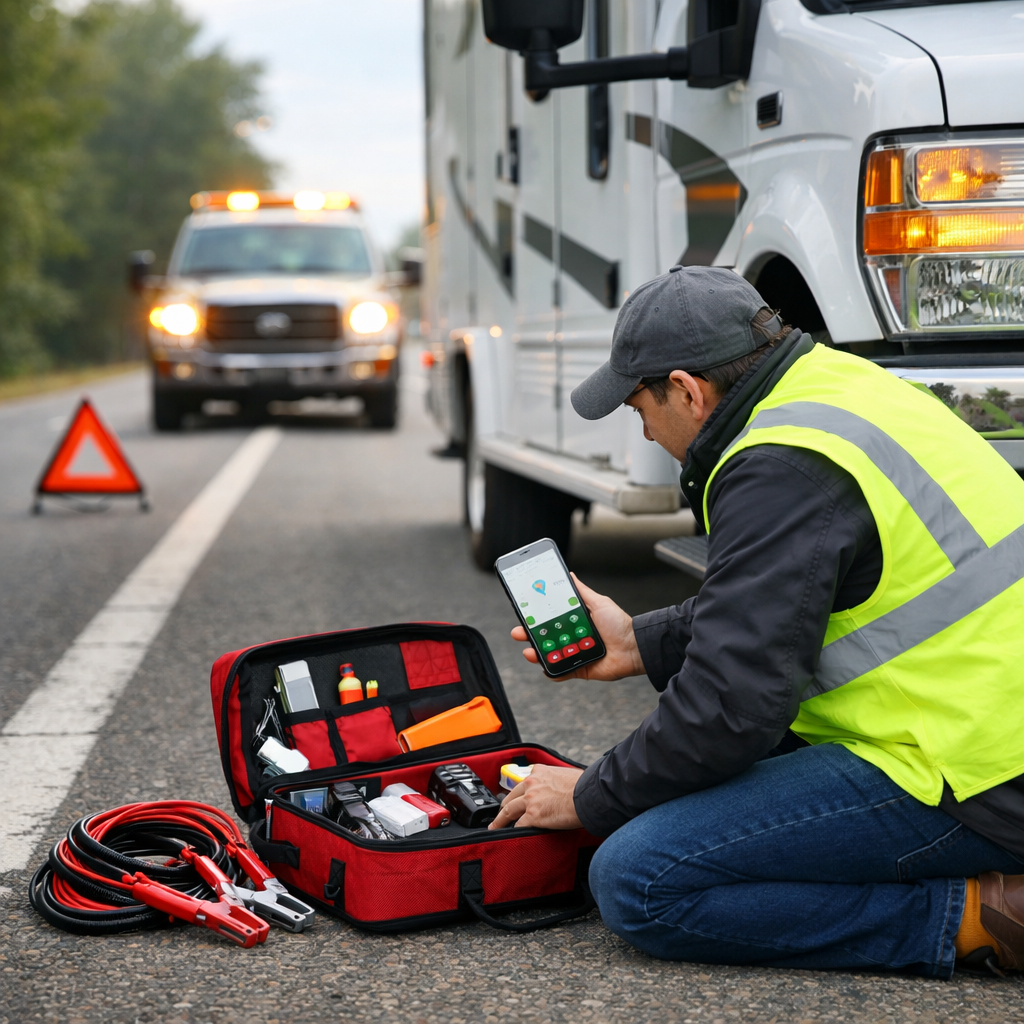
Stock a compact, high‑value RV emergency toolkit
Organize into three sub-kits for speed and space-efficiency: safety/medical; power/diagnostics/repairs; and flood cleanup/drying. Store the safety kit within arm’s reach of the main exit. Start with the tools table in this RV Critic guide and tailor it to your rig.
Common tools and what they solve:
| Tool | Use-case |
|---|---|
| Multimeter | No power at outlets; verify voltage/continuity |
| Spare fuses (DC/ANL) | Dead circuits from blown protection |
| Bottle jack + torque wrench | Tire changes and proper lug torque |
| Air compressor + tire gauge | Inflate to spec; adjust after temp swings |
| Duct tape/zip ties/roof tape | Temporary containment of leaks or loose panels |
| Work gloves + disposables | Safe handling during hot, sharp, or messy repairs |
Safety and medical essentials
Keep a fire extinguisher at each exit and check expiration dates regularly. Include a stocked first aid kit, emergency blankets, and headlamps/flashlights with spare batteries. Add heavy-duty work gloves and disposable gloves to protect hands during hot or contaminated work.
Power, diagnostics, and basic repairs
Carry a portable generator for backup power, plus jumper cables and a battery pack. Include a multimeter, spare DC and ANL fuses, and resettable thermal breakers, along with a compact hand tool set and sealants/tapes for temporary fixes—core items echoed in Thor Industries’ RV toolkit essentials.
Flood cleanup, drying, and moisture control
Begin water removal only when it’s safe. Remove standing water within the first 2 hours using a wet/dry vac or pump; extract saturated carpets in roughly 2–6 hours; remove wet furnishings within about 6–12 hours; and check hidden cavities with moisture meters or inspection cameras in 12–24 hours. Run dehumidifiers and target 30–50% RH with a hygrometer; if safe, disconnect shore power and shut propane during flood events, per the RV flood recovery guide.
Prepare your rig for safer stops and recoveries
Quick setup choices reduce risk and support effective tows and repairs. Before severe weather, top off fuel, fill fresh water, and empty black/gray tanks if an evacuation is possible, as advised by Escapees emergency preparedness advice.
Fire extinguishers, propane, and egress practice
Stage extinguishers at exits, test smoke/CO/propane alarms, and practice two exits per person. Know where to shut off propane and breakers—and do so only if it’s safe and you have a clear exit. Establish a family meeting point outside the rig and rehearse it at each stop.
Tire care, torque checks, and air management
Use a torque wrench to recheck lug nuts after tire service and periodically on long trips; keep an onboard air compressor. Before each drive: inspect tire pressure (cold), tread depth, and sidewalls; remove debris; inflate to manufacturer specs; and revisit pressures after big temperature swings. Carry a quality gauge and valve stem tools, as listed in the essential RV tools checklist.
Towing hardware: receiver hitches, bumper hitches, and anti‑rattle
Heavy-duty receiver hitches (10,000+ lb rated, frame-mounted) offer robust strength for large trailers and stable recoveries. Bumper hitches are for lighter duty and accessories—always verify capacity. Anti-rattle devices stabilize hitch-mounted cargo, improving control and reducing vibration on rough roads. Comparison:
- Heavy-duty receiver hitch—best for large trailers and recovery stability.
- Bumper hitch—light utility/cargo; confirm ratings.
- Anti-rattle—reduces noise and stress on mounts. Verify tongue weight limits before any tow or recovery hookup.
Step‑by‑step actions for common RV emergencies
Roadside breakdown or blowout
- Signal safely off the roadway; set hazards/flares and place triangles.
- Evacuate passengers to a safe spot away from traffic and the roadway edge.
- Call your RV roadside plan and request an RV-capable provider; share GPS and rig specs.
- Decide whether to change a tire only if you’re trained and conditions are safe; use a bottle jack and torque wrench correctly.
- Document damage and the scene for insurance.
- Communicate via satellite messenger if cell coverage is poor.
Note: An RV-specific roadside plan is designed for RV needs.
Fire, propane, or electrical issues
- Alert others; shout “fire” and pull the extinguisher.
- Fight only small, contained fires with a clear exit path; otherwise evacuate immediately.
- Shut propane/electrical only if safe and you have a clear exit.
- Call 911; use a PLB/satellite device if you lack cell service.
- Secure the area and prevent reentry until responders clear it.
- Document once fully safe; note extinguisher checks and alarm status.
Flooding, leaks, or water intrusion
- Ensure personal safety first; avoid energized water and unstable flooring.
- Disconnect shore power and shut propane if safe.
- Remove standing water within 2 hours; wet/dry vac promptly.
- Extract carpets in 2–6 hours; remove wet contents in 6–12 hours.
- Inspect hidden areas with moisture meters in 12–24 hours.
- Dehumidify to 30–50% RH and document all damage with photos.
Medical incidents on the road
- Assess responsiveness and breathing; use first aid within your training.
- Call 911 for serious symptoms; provide exact location.
- Transmit GPS via phone; use a PLB/satellite device if out of coverage.
- Prepare IDs, med lists, and insurance from the go-bag.
- Meet responders at a visible entrance or landmark.
How to use roadside assistance and towing effectively
Save policy numbers and preferred providers in your contacts. Keep photos of plates, VIN, and hitch labels in your phone to speed verification and dispatch.
Share precise location and RV specs
Provide GPS coordinates, highway/mile marker, nearest cross street, or campsite number. Include rig length, height, weight, class, tow vehicle, and hitch type. If coverage is poor, use pre-downloaded offline maps or a physical atlas to confirm your coordinates. Use the spec prompts in this RV Critic guide to avoid back-and-forth.
Request services suited to RV length and weight
Ask explicitly for heavy-duty tow trucks, flatbeds, or wheel-lifts appropriate to your RV and any towed vehicle. RV-focused roadside assistance is designed to match these needs—request what you require up front to avoid delays.
Document, photograph, and coordinate next steps
Photograph damage from multiple angles, gather documents from the go-bag, and direct the tow to a pre-selected shop. Keep a simple claims log with date/time, contacts, photos, receipts, and next actions.
Budget planning for emergency costs
Use a simple framework: plan + reserve + receipts = faster recovery. Pick an RV-specific roadside plan, keep an emergency reserve you can access 24/7, and document every spend with photos and notes for smooth claims and reimbursements. Use the budget table in this RV Critic guide to set ballpark targets.
Roadside plans, insurance, and trip interruption
Layer coverage: roadside plans can handle towing, tire changes, jump starts, fuel delivery, and lockouts, while RV insurance can address collision or comprehensive damage and trip interruption (lodging/transport) after an incident. Compare deductibles and caps, and store policy details in both your phone and go-bag.
Setting a 2025 reserve for towing, repairs, and lodging
Create a dedicated 2025 emergency fund with line items and review quarterly.
| Category | Est. Cost | Notes |
|---|---|---|
| One heavy tow (appropriate to your rig) | ____ | Research local/regional rates along your route |
| Two nights lodging + meals | ____ | Pet-friendly options if traveling with animals |
| Basic repairs/parts | ____ | Belts, hoses, fuses, sealants, labor minimums |
| Pet boarding (if needed) | ____ | Emergency clinic or boarding deposits |
| Communication (satellite device fees) | ____ | Annual/subscription and activation costs |
Practice at each new campground
Run a 10-minute arrival drill: locate exits and shelters, confirm the county for alerts, and note your exact site number on your contact card. A small laminated checklist by the entry door keeps the routine consistent. Use the 10-minute arrival drill in this RV Critic guide as your template.
Site survey, exits, and local alerts
Walk and time two exit routes and note any low branches or obstacles. Identify shelter areas and the nearest water spigot and fire extinguisher station where applicable. Verify the county and add local alert channels; test your weather radio reception.
Family roles, pet plans, and quick drills
Assign roles: who grabs the go-bag, who handles pets, who calls 911, who shuts propane/breakers (if safe). Run a two-minute fire/evac drill, confirm the meeting point, and keep pet carriers leashed and ready.
Frequently asked questions
How do I get emergency help if there’s no cell service?
Use a personal locator beacon or a satellite messenger/phone to reach rescuers and share your location; keep it near the main exit. Save this RV Critic guide offline for quick steps.
What tools should every RVer carry for breakdowns?
Carry a multimeter, spare fuses, duct tape, zip ties, tire gauge, bottle jack, torque wrench, air compressor, a compact hand tool kit, plus a portable generator and jumper cables. The tools table in this RV Critic guide covers the basics.
When should I use a fire extinguisher versus evacuate?
Use an extinguisher only for small, contained fires with a clear exit. If flames spread, involve propane, or block your exit, evacuate immediately, call 911, and follow the steps in this RV Critic guide.
How do I choose a roadside plan that covers my RV?
Pick an RV-specific plan that matches your rig’s class, length, and weight and includes heavy-duty towing, tire service, and winching. Save policy numbers and your rig specs in your phone using the prompts in this RV Critic guide.
What steps should I take after flood damage to prevent mold?
Once safe, shut power/propane if you can, remove standing water fast, extract carpets, remove wet contents, and dehumidify to 30–50% RH. Use moisture meters to find hidden damp spots and document everything for claims using the timeline in this RV Critic guide.