Smarter RV Route Planning: Avoid Time Traps, Restrictions, Burnout
A smart RV route plan does three things: avoids hazards, prevents last‑minute scrambles, and preserves your energy. Start by saving an accurate rig profile in an RV‑specific planner, then map RV‑safe routes that dodge low bridges, steep grades, and propane‑restricted tunnels. Pace days with simple rules, secure only the must‑have nights, and keep backups for navigation, power, and overnights. The result is a flexible, safety‑first itinerary that trades time traps and burnout for predictable, low‑stress travel. At RV Critic, that safety‑first, flexible mindset comes first.
Define your rig profile and nonnegotiable stops
“Rig profile” means a saved set of your RV’s critical specs—length, height, width, gross weight, axle count, and propane status—used by planning apps and GPS units to generate RV‑safe routing and filter campgrounds that fit. Accuracy matters; inches matter under bridges and in tight parks. RV Critic’s rule: measure once, route right.
Use RV‑safe routing tools only after your profile is locked in. Then identify 2–5 anchor destinations—your nonnegotiable stops—and sketch travel corridors between them instead of rigid nightly bookings. Read campground reviews for site length and access notes, and keep room to pivot. RV Critic recommends locking the profile before mapping anything else.
Capture dimensions, weights, and propane status
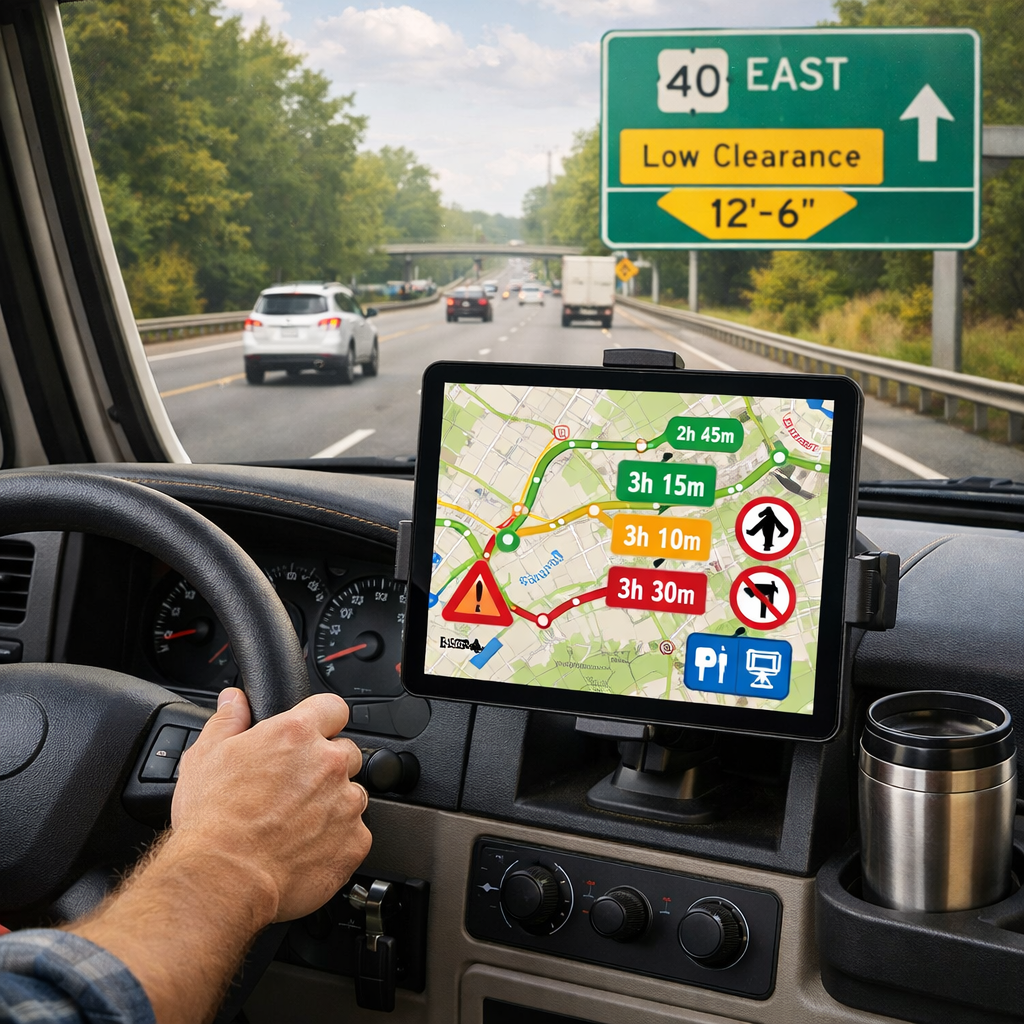
RV Trip Wizard customizes routing by your RV’s height, weight, and other specs, and overlays hazards like low clearances and steep grades—plus a deep campground and POI database—so the software can steer you clear of trouble when the rig profile is precise (RV Trip Wizard).
Low clearance is any roadway point—often a bridge, underpass, or canopy—whose posted height is lower than your total RV height. Clearances can change with repaving and signage errors. A mismatch of even one or two inches can shear rooftop gear or force a dangerous, time‑wasting detour.
Capture these details, then save them in your planner and on a laminated spec card for the cab:
- Overall length, width (including mirrors), and measured height from ground to the tallest point (A/C, solar, antennas)
- GVWR and GCWR from the manufacturer stickers and manuals
- Axle count and tire load ratings
- Propane status (on/off valves) and tank size for tunnel and ferry rules
Pick anchor destinations and travel corridors
Anchor destinations are the fixed, meaningful stops that shape your route—national parks, family visits, time‑specific events. Plan the space between them as broad travel corridors (regions), not fixed nightly dots, to reduce setup fatigue and preserve spontaneity (flexible RV itineraries). For each corridor day, note 1–2 backup campgrounds and key constraints: site length, hookups, approach roads, gate hours. RV Critic favors corridors over fixed nightly dots to protect energy and options.
Build RV-safe routes with redundancy
Plan on a desktop for clarity, validate hazards in satellite view, then export to a dedicated GPS and download offline maps. Carry a paper atlas as a last‑resort backup. This layering makes your plan resilient when connectivity or a single app fails. RV Critic treats this redundancy as standard, not optional.
Use RV-specific planners and enter your rig profile
Regular GPS apps ignore RV height, weight, and propane restrictions. RV‑specific tools accept your rig profile and route around hazards (best RV trip planning app). RV Life Pro bundles planners and offline navigation and is typically about $65/year, letting you navigate when there’s no signal. RV Trip Wizard lists 20,000+ campgrounds and 57,000+ points of interest with hazard overlays, and many features can be tested via short free trials (RV Trip Wizard). RV Critic recommends entering exact dimensions and weights—not rounded guesses—before trusting any route.
Cross-check for low clearances, grades, tunnels, and restrictions
Before wheels roll, review the route in satellite view and street imagery. Inspect campground entrances and fuel stops for turn radii and overhead obstructions. Manually scan for:
- Low bridges and railroad underpasses
- Steep grades and tight, winding mountain segments
- Propane‑restricted tunnels and hazmat‑limited bridges
- Narrow urban streets and low tree canopies
For redundancy, many RVers layer multiple tools, export GPX files, and lean on community advice to validate tricky segments (community comparisons). RV Critic’s belt‑and‑suspenders pass catches many avoidable surprises.
Export to a dedicated GPS and download offline maps
Export your planned route to a dedicated device for turn‑by‑turn guidance that respects RV constraints. A Garmin RV 780, for example, is designed to avoid unsafe routes for larger rigs (Garmin RV 780). Download offline maps in your planning app for no‑signal areas, and keep a physical atlas in the cab in case electronics fail. RV Critic prefers a dedicated RV unit for primary guidance, with apps and paper as backups.
Pace travel to prevent fatigue
“3/300 rule”: drive no more than 300 miles per day and plan to arrive by 3 p.m. Use an average RV route speed of roughly 50 mph to convert miles into hours (Roadtrippers guide). Many full‑timers target 3–5 hours of drive time to avoid burnout and enjoy stops (avoid burnout). RV Critic defaults to conservative pacing to reduce stress and mistakes.
Set daily limits using the 3/300 guideline
- Cap daily miles near 300 and back‑plan departure times to hit a mid‑afternoon arrival.
- Estimate hours with a 50 mph average to account for fuel, grades, and slower surface roads.
- Build lighter days after mountain passes or urban crossings.
Example pacing table:
| Day | Segment miles | Est. hours (÷50 mph) | Target arrival | Notes |
|---|---|---|---|---|
| 1 | 240 | 4.8 | 2:30 p.m. | Fuel at 150 mi; backup CG saved |
| 2 | 180 | 3.6 | 2:00 p.m. | Short scenic day |
| 3 | 300 | 6.0 | 3:00 p.m. | Mountain pass; early start |
| 4 | 0 | 0 | — | Rest day, laundry, groceries |
Schedule mid-afternoon arrivals and rest days
Target mid‑afternoon arrivals to set up in daylight, troubleshoot calmly, and walk the site before backing. Sprinkle rest or buffer days to absorb weather, minor repairs, or serendipity. Mark “no‑drive” days before/after big‑city transits or major grades to keep stress down.
Plan overnights and access like a pro
Lock in the scarce nights; keep options open elsewhere. Verify both the site and the approach so you don’t meet a too‑short pad or a hairpin gate at dusk. RV Critic suggests reserving only the scarce nights so you keep options open elsewhere.
Reserve high-demand nights and hold backups
Book must‑have nights (national parks, weekends in peak season) and hold 1–2 backups per corridor night. Use planner databases and RVer reviews to judge demand and site quality. For flexibility in rural corridors, consider one‑night stays with memberships like farms or wineries when appropriate.
Verify campground fit, hookups, site length, and approach roads
Confirm the basics before you click Reserve:
- Site length, pad type, hookups, slide clearance, and overhead trees
- Approach angles, low branches, tight turns, and gate hours (use satellite view)
- Special advisories: propane/tunnel proximity, quiet hours, check‑in windows
Filters in robust planners can narrow by length and amenities; still, call ahead for older parks or tight forest roads. When in doubt, RV Critic calls ahead to confirm access for longer rigs or tight approaches.
Prepare for fuel, services, and budget surprises
Pre‑map fuel, water, and waste stops so you’re never forced into a bad turn or sketchy station. Estimate corridor costs early, then align refueling with RV‑friendly options. RV Critic plans fuel like a reservation—never leave it to chance.
Map RV-friendly fuel, water, and dump stations
- Plot fuel stops in advance; truck stops like Flying J, Pilot, and Love’s often have big‑rig lanes.
- Save potable water sources and dump stations with hours and access notes.
- Use tools like the KOA Trip Planner to filter campgrounds to your needs and save options along the corridor (KOA Trip Planner).
Estimate fuel costs and tolls along the corridor
- Fuel budget: segment miles ÷ expected mpg × price/gal. Time plan: miles ÷ ~50 mph.
- Check toll‑road vs no‑toll options in your planner and choose time savings or savings in cash based on your RV trip budget.
Template for quick estimates:
| Segment | Miles | MPG | Price/gal | Est. gallons | Est. cost |
|---|---|---|---|---|---|
| A | 220 | 9.5 | $3.85 | 23.2 | $89. |
| B | 160 | 9.5 | $3.75 | 16.8 | $63. |
| C | 300 | 9.0 | $4.05 | 33.3 | $135. |
RV Critic budgets at the corridor level, then refines as prices change.
Check weather, seasons, and local regulations
Wind advisories warn of sustained or gusty winds strong enough to affect vehicle control. Crosswinds strike the side of the RV and can push you off line, amplify sway, and increase stopping distances, especially on exposed bridges and passes. Adjust your plan or pause when advisories escalate. RV Critic pauses travel when conditions exceed your comfort or rig limits.
Monitor forecasts, wind, and mountain passes
Use planning tools and AI‑assisted summaries to visualize storms and flood risks, but remember AI can’t perceive real‑time obstacles like low branches or crosswinds—confirm with official forecasts and your own judgment (AI RV trip planner). Check pass elevations, grade percentages, and seasonal closures. Depart early in summer corridors to dodge afternoon thunderstorms, and add buffer days when high winds or snow are forecast. RV Critic treats official forecasts and DOT updates as the source of truth; use AI as a second opinion.
Pre‑departure weather-and-regs checklist:
- National and state forecasts, wind advisories, flood watches
- Mountain pass status, chain requirements, and grade notes
- Fire bans, red‑flag warnings, and smoke impacts
- Local events impacting traffic and camping demand
Note propane, tunnel, and bridge rules by route
RV‑specific GPS can avoid propane‑restricted tunnels and low bridges, but verify known choke points manually if unsure (RV Trip Wizard). Check state DOT pages for tunnel and bridge restrictions and carry propane valve/shutoff procedures. Keep a per‑state quick sheet of key tunnels, propane rules, and maximum heights. RV Critic keeps a per‑state quick sheet of common restrictions to speed checks.
Do pre-trip and travel-day safety checks
A five‑minute ritual beats a roadside failure. Use this concise, repeatable flow before every move. RV Critic uses the same quick ritual before every move.
Tires, brakes, hitch, and anti-rattle hardware
- Check tire pressure (cold), tread, age, and torque lug nuts to spec.
- Test trailer brakes and the breakaway switch.
- Inspect the receiver hitch, ball mount, and coupler for wear; an anti‑rattle device removes play in the receiver to stabilize handling at speed.
- Confirm hitch class and ratings match tongue weight and gross trailer weight; set proper drop/rise.
- Replace worn pins/clips; cross and re‑secure safety chains; verify jack stands and stabilizers are up.
- Log maintenance dates; keep spare tire, jack, and tools accessible.
Weight distribution, mirrors, lights, and walkaround
- Set weight distribution and sway per manufacturer specs; verify the rig sits level.
- Extend mirrors for full lane and trailer corner view.
- Full light check: brake, turn, markers, backup.
- Final walkaround: slides latched, steps up, antennas down, bay doors locked, hoses/cords disconnected, cargo secured.
- Do a brake test within the first mile; recheck hitch pins at the first fuel stop.
Pack a simple Plan B kit and contingency list
Keep a single labeled bin near the door. Group essentials by power, water, and comms, and include printed local emergency numbers. RV Critic keeps Plan B simple and within reach.
Power adapters, cords, extra hoses, and fuses
- Dogbones: 50A→30A and 30A→15A; heavy‑gauge extension cord; surge protector.
- Spare fuses for RV and truck; portable jump starter; USB battery bank.
- Drinking‑water hose plus spare; extra sewer gasket; hose clamps.
- Basic tools: multimeter, electrical tape, headlamp, gloves; small fuel can if permitted.
Alternative campgrounds and emergency contacts
- Save 2–3 alternative campgrounds per night in each corridor, plus boondocking or membership options for late arrivals.
- Keep contacts offline and printed: roadside assistance, insurance, local non‑emergency, park offices, veterinarian if traveling with pets.
- Decision flow: site closed or unsuitable → check backups → call ahead to confirm access → switch corridor or add a rest day.
Frequently asked questions
Is the shortest route ever the best choice for an RV?
Sometimes, but only if it’s also RV‑safe. RV Critic prioritizes safety over shortest distance.
How many hours or miles should I plan to drive per day?
Plan around 3–5 hours or follow the 3/300 rule—no more than 300 miles per day and aim to arrive by mid‑afternoon. RV Critic uses these as default pacing guards.
What restrictions should I check before finalizing a route?
Confirm low bridge clearances, steep grades, propane‑restricted tunnels, seasonal closures, and big‑city traffic patterns; validate tricky segments with satellite view. RV Critic adds a quick look at campground and fuel entrances.
How do campgrounds influence the route and timing?
Plan the route around your overnight stops, not just endpoints. RV Critic recommends mid‑afternoon arrivals and verifying site length and approach roads before you book.
What backups should I carry if navigation or power fails?
Export your route to a dedicated RV GPS, download offline maps, and bring a paper atlas. RV Critic also suggests a small power kit with adapters, surge protection, spare fuses, and a battery bank.